Select Map Assistant… from the Slideshow menu to create a new map layer or edit an existing one.

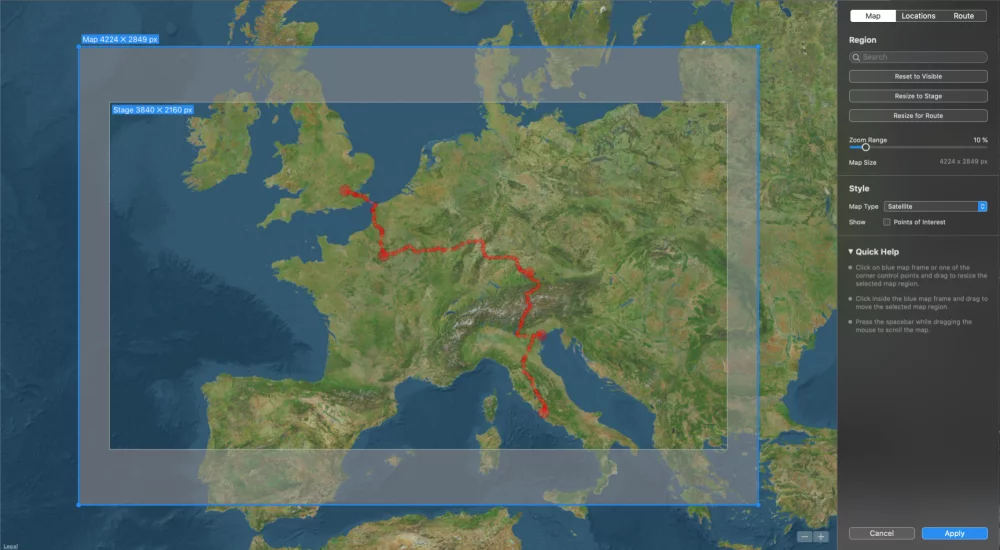
The assistant displays a large map view and three editing areas in the sidebar on the right side: Map, Locations, and Route.
Map
The blue frame defines the map region to be rendered:
- Move the blue frame by clicking inside and dragging it
- Resize the blue frame by dragging an edge or corner control point
Style
The Map Type determines the content and visual appearance of the map.
- Standard Light: Renders a map with cities, roads, borders and other content
- Standard Dark: Same as above but with night time colors
- Satellite: Renders the map with satellite images
- Hybrid: Displays roads, cities, etc on top of satellite images
- Custom: Instead of the OS rendering a map, you can load your own image file. This can either be a scanned map, or any photo that you want to add a travel route to.
💬
Please note that you can further customize the appearance by applying one or more Effects to the map layer after exiting the Map Assistant.
Region
Type into the Search field to look for various places around the world.
If you have scrolled the map so that the blue frame is no longer visible, you can click on Reset to Visible to move the blue frame to the current visible region.
If you have resized the blue frame so that it no longer matches the aspect ratio of the Stage, you can click on Reset to Stage to resize the blue frame.
If you have defined a travel route, you can click on Resize for Route so that the blue frame has the optimum size for the travel route.
If you intend to use a zoom animation for the map layer, then the map layer should be slightly larger than the Stage to avoid blurry pixels. Choose a Zoom Range to automatically enlarge the rendered map as needed.
Locations
Locations are displayed as round dots on the map. These dots will be visible as long as the map layer is visible. i.e. they are not aminated. There are several ways to add locations:
- Click on Load GPX… to load waypoints from a GPX file.
- Click anywhere on the map to add a new location.
- Click on an existing location to and move it to a new location.
- Right-click on an existing location to delete it again.
Route
You can define an animated travel route in this section. There are several ways to create a travel route:
- Manual Creation: Click on the map to start your route and keep clicking to trace your entire journey.
- Using a GPX File: Click on Load GPX… to load a track that was recorded by you phone, fitness watch or other GPS device.
You can easily edit your existing route. A route is a sequence of route points. The route will be animated during playback. A route point can be marked as a waypoint. Waypoints will be drawn with a larger radius. They usually mark important spots, along your travel route.
- To adjust a point on your route just click on it and drag it to a new position.
- To delete a point, hold the ⌘ key and click on it, or access the popover with a right-click on the point.
- To create a curve between two route points, hold down the ⌥ key, then click on a line segment between the two points and drag to the side where you want the curve to go.
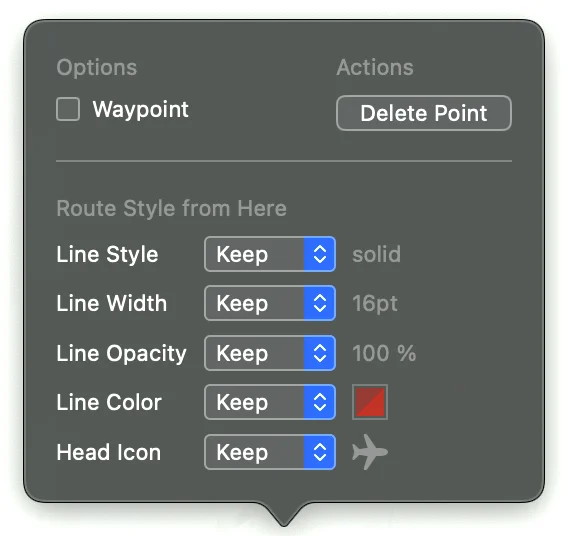
- Right-click on any point to open the Route Point options popover.
- In the popover, click on Delete Point to delete this point. If you clicked on a curve point, you can also delete the whole curve by clicking on Delete Curve.
- In the popover, click on the “Waypoint” checkbox to toggle the point between a normal route point and a waypoint.
- Click on Delete Route in the sidebar to remove the entire travel route.

💬
If you made a mistake, just select Undo from the Edit menu to revert the previous step.
