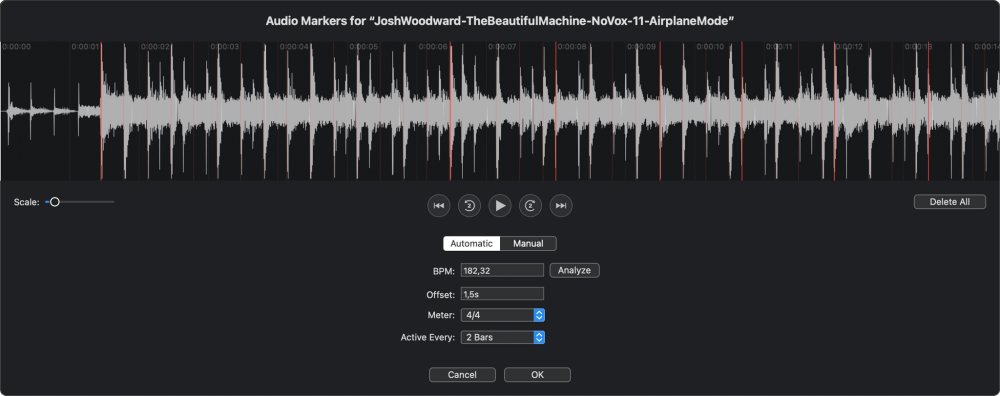
Sélectionnez une piste audio dans le Storyboard ou la timeline, puis choisissez Audio Marker Assistant... dans le menu Slideshow ou dans le menu contextuel du Storyboard pour ouvrir l'assistant.

barre de menu. En haut, vous verrez la forme d'onde audio et les boutons de lecture. Vous pouvez faire défiler la forme d'onde. Utilisez le curseur d'échelle ou un geste de pincement à deux doigts sur un trackpad pour zoomer dans la forme d'onde et révéler plus de détails.
L'assistant dispose de deux flux de travail différents : Automatique et Manuel. Celui qui convient le mieux dépend du type de musique que vous utilisez :
- La musique pop, rock ou dance avec un rythme régulier convient à la création de marqueurs automatiques.
- La musique classique ou les bandes sonores qui changent souvent de tempo conviennent mieux à la création manuelle de marqueurs.
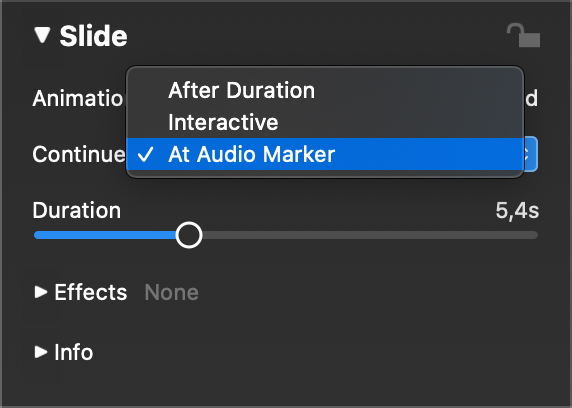
Lorsque vous cliquez sur OK, les diapositives situées au-dessus de l'élément audio sont automatiquement configurées pour continuer "Au marqueur audio" et leurs durées sont ajustées, de sorte que les vitesses d'animation restent inchangées.
Marqueurs manuels
En mode manuel, il vous suffit de lire l'audio et d'appuyer sur la touche M ou sur le gros bouton au milieu avec le rythme de la musique pour ajouter de nouveaux marqueurs. Réécoutez l'audio depuis le début pour vérifier l'exactitude des marqueurs.
Si un marqueur est légèrement décalé, il suffit alors de le faire glisser jusqu'au bon emplacement. Cliquez sur ⊗ en haut d'un marqueur pour le supprimer. Les marqueurs ne sont utilisés pendant la lecture que s'ils sont actifs. Cliquez sur le cercle inférieur d'un marqueur pour basculer son état actif.
Création automatique de marqueurs
Passez à Automatique si vous savez qu'une chanson a un rythme régulier (ce qui est souvent le cas pour la musique pop ou rock). Cliquez sur Analyze pour déterminer automatiquement les valeurs BPM (battements par minute) et Offset. Cela fonctionne généralement très bien pour la musique pop, rock ou techno, mais c'est moins fiable pour la musique d'orchestre, comme les bandes sonores ou la musique classique.
💬
Si la valeur BPM a été déterminée correctement, mais que le décalage est incorrect, il suffit d'appuyer sur la touche ⌥ et de faire glisser un marqueur pour déplacer tous les marqueurs simultanément - de cette façon, vous pouvez corriger le décalage en faisant correspondre visuellement les marqueurs à la forme d'onde.
💬
Si vous connaissez déjà les valeurs de BPM et de décalage, vous pouvez également les saisir numériquement dans les champs de texte.
Marqueurs mobiles
Si un ou plusieurs marqueurs sont légèrement décalés, vous pouvez les repositionner de différentes manières :
- Faire glisser une ligne de repère pour déplacer ce seul repère
- Appuyer sur la touche ⌥et faites glisser un marqueur pour déplacer tous les marqueurs en même temps. Cela revient à ajuster la valeur du décalage.
- Cliquez sur le losange d'un marqueur pour faire de ce marqueur le "point d'ancrage" de l'étape suivante.
- Appuyer sur la touche ⌘ et faites glisser n'importe quel marqueur autre que l'ancre pour répartir les marqueurs de manière équidistante. C'est la même chose que d'ajuster le BPM valeur.
💬
Gardez à l'esprit que cette méthode sera plus précise si l'ancre et le marqueur traîné sont éloignés l'un de l'autre. De cette manière, vous pouvez rapidement obtenir des marqueurs assez précis pour un rythme musical régulier - cela fonctionne bien pour la musique pop et rock, moins bien pour la musique classique.

Activation des marqueurs
Si vous avez un marqueur pour chaque temps d'un morceau, c'est manifestement beaucoup trop rapide pour changer de diapositive. C'est pourquoi vous ne devriez activer un marqueur que de temps en temps. Vous obtiendrez l'effet le plus agréable si vous connaissez le mètre du morceau (par exemple 4/4 ou 3/4) et si vous choisissez d'activer un marqueur à chaque mesure, toutes les 2 mesures, ou toutes les 4 mesures.
Vous pouvez également activer ou désactiver manuellement les marqueurs en cliquant sur le cercle inférieur d'un marqueur. Un marqueur actif est coché et s'affiche en rouge opaque, tandis qu'un marqueur inactif est transparent.
💬
Dans le cas d'un morceau en 4/4 qui s'active toutes les deux mesures, ce serait tous les huit marqueurs.
Synchronisation des diapositives
L'ajout de marqueurs à une piste audio est la première étape de la synchronisation des diapositives avec l'audio. La deuxième étape est réalisée automatiquement lorsque vous cliquez sur le bouton OK : Toutes les diapositives situées au-dessus de la piste audio sont commutées pour continuer "Au marqueur audio" et leurs durées sont automatiquement ajustées pour que les vitesses d'animation restent correctes.
💬
Si, pour une raison ou une autre, les diapositives sont ensuite transférées vers un type de continuation différent, la synchronisation peut être perdue. Dans ce cas, il suffit de revenir à la continuation "At Audio Marker".
Une fois que vous avez ajouté des marqueurs audio à votre piste audio, il vous suffit de sélectionner toutes les diapositives situées au-dessus de la piste audio, d'ouvrir les Options de diapositive et de sélectionner Continuer au marqueur audio. Les transitions des diapositives sont désormais parfaitement synchronisées avec la musique !

