アニメーションは、スライドショーをより面白くし、画像の特定の部分に注目させるクールな方法です。しかし、アニメーションの数が多すぎたり、速すぎたりすると迷惑になるので、賢く使いましょう!
アニメーション・アシスタント
素晴らしいスライドショーをすばやく作成したい場合は、アニメーションアシスタントを使用できます。これは、いくつかのルールに基づいて選択したレイヤーに自動アニメーションを適用するのに役立ちます。これらのルールは、スライドショーに新しいコンテンツを追加するときにも機能します。新しいスライドショーを開始する前に、アニメーション アシスタントでこれらのルールを確認およびカスタマイズできます。
FotoMagico 6.6以降では、アニメーションアシスタントにAIによる自動画像解析機能が追加されました。AIが各画像の注目ポイントを判断し、画像の真ん中だけでなく、注目ポイントにフォーカスしたアニメーションを作成します。
💬
アニメーション アシスタントのルールは、スライドショーに挿入されるすべての新しいレイヤーに自動的に適用されます。アニメーションアシスタントを開いて現在のルールを確認し、新しいスライドショーで作業を開始する前に、お好みに合わせてカスタマイズしてください。
アニメーション アシスタントを開くには、Slideshow メニューから Animation Assistant... を選択するか、⌥+⌘+1 を押します。
手動アニメーション
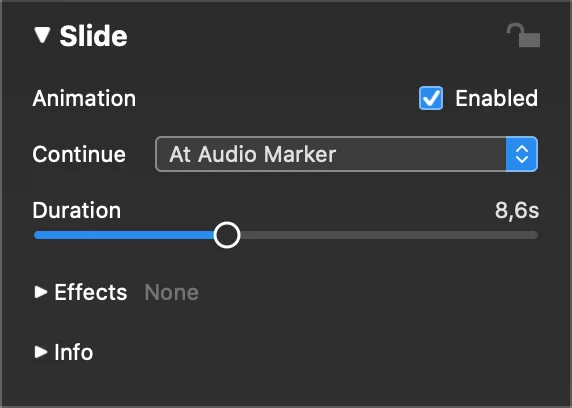
手動でアニメーションを編集することもできます。レイヤーをアニメーションするには、スライドでアニメーションが有効になっていることを確認します。スライドオプションのアニメーションチェックボックスをチェックします。また、スライドショーメニューや右クリックメニューからアニメーションを有効にすることもできます。

アニメーションを有効にすると、ステージには同じスライドが2回表示されます:アニメーションの開始時に左側に1回、終了時に右側に1回です。
アニメーションを作成するには、左側でレイヤーの配置、ズーム、回転を行い、右側で同じ操作を繰り返します。アニメーションの速度は、スライドオプションで設定できるアニメーションの継続時間によって決まります。再生ボタンをクリックするか、スペースを押すと、アニメーションをプレビューできます。
注目
観客の注意を画像の特定の部分に集中させるために、パン&ズームアニメーションを使うことができます。このエフェクトは、これを広めたドキュメンタリー映画監督ケン・バーンズにちなんで名付けられました。
FotoMagicoには、パン&ズームのフィックスポイントインジケーターと呼ばれる小さな白い円が用意されています。これは、アニメーション中に固定され、注目の的になるスポットを示しています。

レイヤーをドラッグまたはズームすると、インジケーターが自動的に更新されます。
💬
また、このインジケータを画像レイヤーの注目させたい部分にドラッグすることもできます。
インジケーターサークルが表示されない場合、いくつかの理由が考えられます:
- レイヤーはズームを使用しない
- パン&ズームのフィックスポイントインジケーターが 好み
- インジケータが現在表示されている領域の外側にある
アニメーションのタイミング
画像オプションのアニメーション速度カーブでは、アニメーションのタイミングを微調整できます。カーブ上のポイントをドラッグして、アニメーションの遅延、イージングイン、イージングアウト、最終遅延を設定できます。以下のようなプリセットオプションがあります:
- リニア、
- 楽になる、
- イーズ・アウト、そして
- イージー・イン/アウト
をご覧ください。
デフォルトでは、画像は等速でアニメーションします:

アニメーションのタイミングはバーで表される。左と右の黄色い影の部分は、入りと出のトランジションを表し、中央の部分はアニメーションそのものを表しています。アニメーションを計画する際には、これらのトランジション領域を考慮することが重要です。

カーブポイントを好きな位置にドラッグして、タイミングをコントロールできる。トランジションの境界に自動的にスナップします。もっとコントロールしたい場合は、一時的にスナップを無効にすることができます。
その他の例
アニメーションのタイミングを理解するのに役立つ例をいくつか紹介しよう:
例1: アニメーションは短いポーズで始まり、ゆっくりと緩和され、スライドの終わりまで一定の速度で続きます。

例2: アニメーションはすぐに始まり、フィニッシュに向かって緩やかになり、次のスライドに移る前に一時停止します。

例3: アニメーションは途中でしばらく止まってから、最後まで続きます。

これらのヒントを使えば、スライドショーに素晴らしいアニメーションを作成し、観客に感動を与えることができます!いろいろな効果やタイミングを試して楽しんでください!
